MASTERNODE SETUP GUIDE#
PREPARATION#
This guide describes the procedure for setting up the masternode.
When setting up the master node, please check the following:
- Holds 10000 Omotenashi Coin
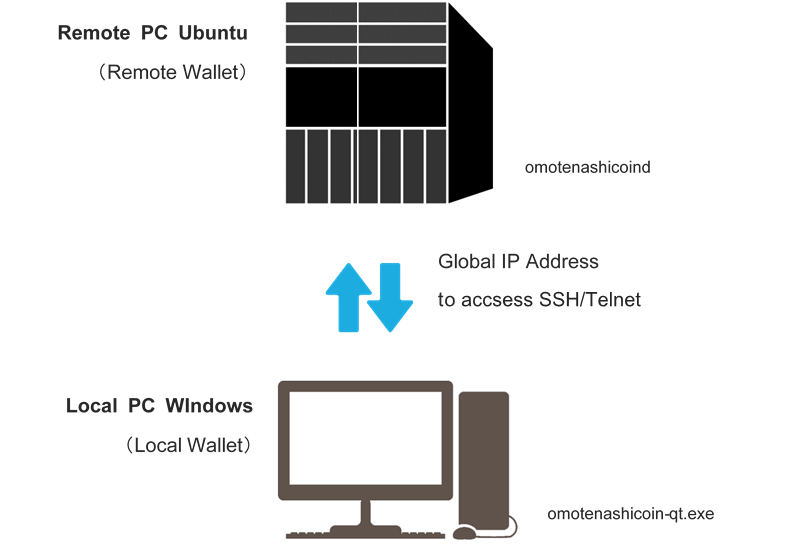
- Local PC: Wallet (Windows 10 environment) for saving Omotenashi Coin launches
- Remote PC: VPS Ubuntu Linux 16.04
OVERALL VIEW#
STEP 0 : PREPARATION#
If your wallet is running, to exit.
Register the following contents in% appdata% \ OMOTENAHICOIN \ omotenashicoin.conf:
enablezeromint=0
zeromintpercentage=0
After registration, start wallet again.
STEP1 : LOCAL WALLET CREATE ADDRESS FOR MASTER NODE#
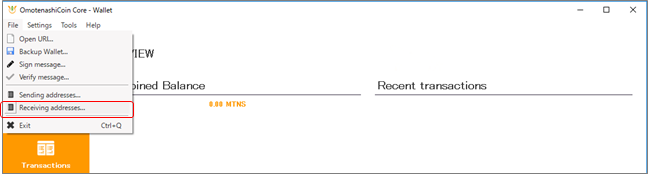
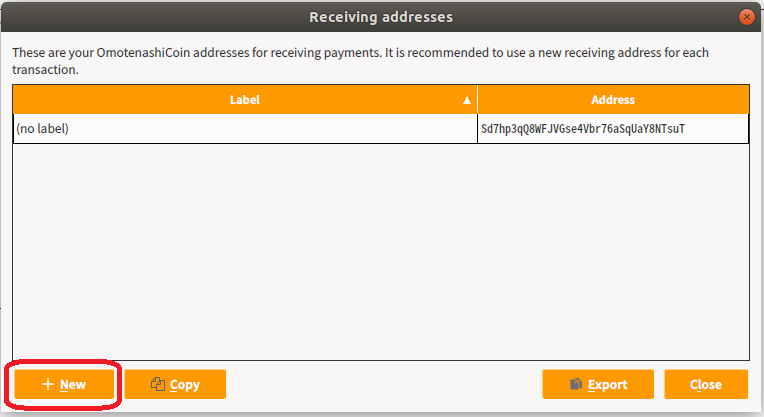
1.From the Windows 10 wallet menu, select [File] -> [Receiving address] .
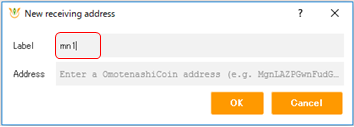
2.Specify [mn1] for the label and create a new address.
NOTE: The label name created here will be used in the following settings
STEP 2 : MONEY WILL BE SENT TO THE ADDRESS (MN 1)#
1.From another wallet or a local wallet, you remit 10000 MTNS to the newly added address (mn 1)
2.You will wait until the transferred information is approved (around 15 minutes)
STEP 3 : GENERATE A MASTER KEY IN THE LOCAL WALLET#
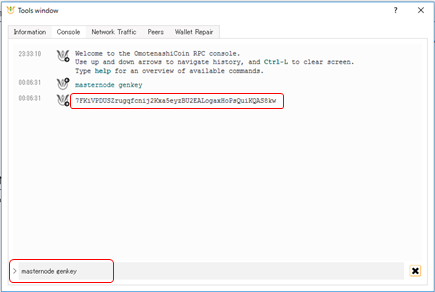
1.Select [Tools] -> [Debug console] and open the debugging console.
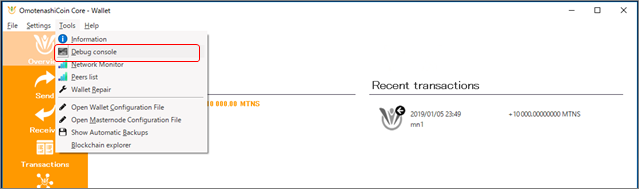
2.Enter the following command
masternode genkey
Write down the execution result.
NOTE: This is the masternode genkey we will use later in the setup
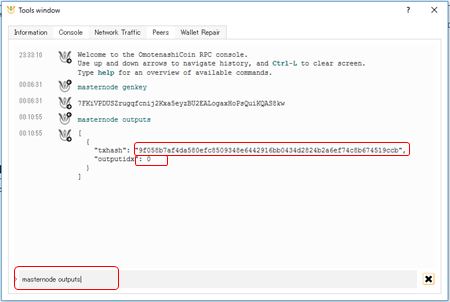
STEP 4 : CHECK OUTPUT OF MASTER NODE#
1.Enter the following command from the debug console:
masternode outputs
Write down the execution result.
STEP 5:WRITE THE MASTERNODE SETTING IN THE CONF FILE#
1.Shut down Wallet
2.Go to the data directory (% appdata% \ OMOTENASHICOIN) and add the following line to masternode.conf.
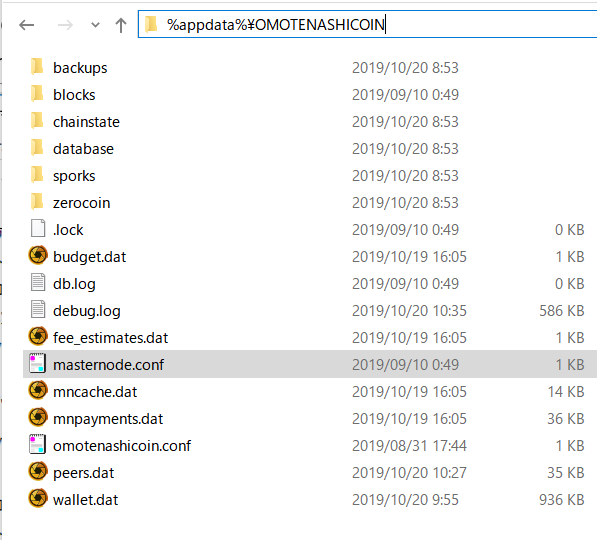 Example)
NOTE: The following content is described on one line.
mn1 139.12.115.195:12181 7FKiVPDUSZrugqfcnij2Kxa5eyzBU2EALogaxHoPsQuiKQAS8kw 9f058b7af4da580efc8509348e6442916bb0434d2824b2a6ef74c8b674519ccb 0
Setting up the local wallet (on Windows) is finished.
Next, set up the remote wallet (on Ubuntu Linux).
STEP 6 : INSTALL OMOTENASHI COIN CLIENT ON UBUNTU LINUX#
1.Install the latest version of Omotenashi Coin module on Ubuntu VPS.
view VPS registration registration and setting
2.Edit omotenashicoin.conf in the data directory.
mkdir ~/.omotenashicoin
vi ~/.omotenashicoin/omotenashicoin.conf
3.Add the following line:
NOTE: do not need ‘<’ and ‘>’ in following line. change YourUsername and YourPassword.
rpcuser=< YourUsername >
rpcpassword=< YourPassword >
enablezeromint=0
zeromintpercentage=0
rpcallowip=127.0.0.1
listen=1
server=1
daemon=1
logtimestamps=1
maxconnections=64
masternode=1
externalip=< VPS global ip address >
bind=< VPS global ip address >
masternodeaddr=< VPS global ip address >:12181
masternodeprivkey=< Step3(2) input genkey command result value >
STEP 7 : START MASTERNODE#
1.Launch the local wallet.
2.Enter the following command on the local wallet debug console:
startmasternode alias false <label name of address of masternode>
Example) label name of address of masternode : mn1
When executed, the following will be displayed:
“overall” : “Successfully started 1 masternodes, failed to start 0, total 1”,
“detail” : [
{
“alias” : “<Name of your masternode>”,
“result” : “successful”,
“error” : “”
}
3.Start masternode on the remote wallet.
./omotenashicoind -daemon
./omotenashicoin-cli startmasternode local false
After about an hour, the message "masternode started normally" is displayed.
4.Check the status of the masternode on the remote wallet.
./omotenashicoin-cli masternode status
The following items are displayed:
{
“txhash” : “49012766543cac37369cf3813d6216bdddc1b9a8ed03ac690221be10aa5edd6c”,
“outputidx” : 1,
“netaddr” : “< your VPS ip address >:12181”,
“addr” : “< your wallet address >”,
“status” : 4,
“message” : “Masternode successfully started”
}
The setup of Masternode is finished.
Appendix#
How to set up multiple master nodes#
This section describes how to start multiple master nodes.
Assumptions:
Set three master nodes in one Windows wallet.
Prepare VPS environment of 3 bases.
STEP 1 : LOCAL WALLET CREATE ADDRESS FOR MASTER NODE#
Repeat this procedure three times. Add mn1, mn2, mn3.
STEP 2 : MONEY WILL BE SENT TO THE ADDRESS#
Transfer 10000MNTS to addresses mn1, mn2, and mn3.
STEP 3 : GENERATE A MASTER KEY IN THE LOCAL WALLET#
Execute the masternode genkey command three times.
STEP 4 : CHECK OUTPUT OF MASTER NODE#
The contents of the remittance to mn1, mn2, mn3 in STEP2 will be displayed.
STEP 5:WRITE THE MASTERNODE SETTING IN THE CONF FILE#
Describe the contents of mn1, mn2 and mn3 in STEP 4.
mn1 <1st your global IP for VPS>:12181 <1st masternode genkey command value> <1st masternode outputs command txhash value> <1st masternode outputs command outputidx value>
mn2 <2nd your global IP for VPS>:12181 <2nd masternode genkey command value> <2nd masternode outputs command txhash value> <2nd masternode outputs command outputidx value>
mn3 <3rd your global IP for VPS>:12181 <3rd masternode genkey command value> <3rd masternode outputs command txhash value> <3rd masternode outputs command outputidx value>
STEP 6 : INSTALL OMOTENASHI COIN CLIENT ON UBUNTU LINUX#
Set STEP6 for each of the three nodes.
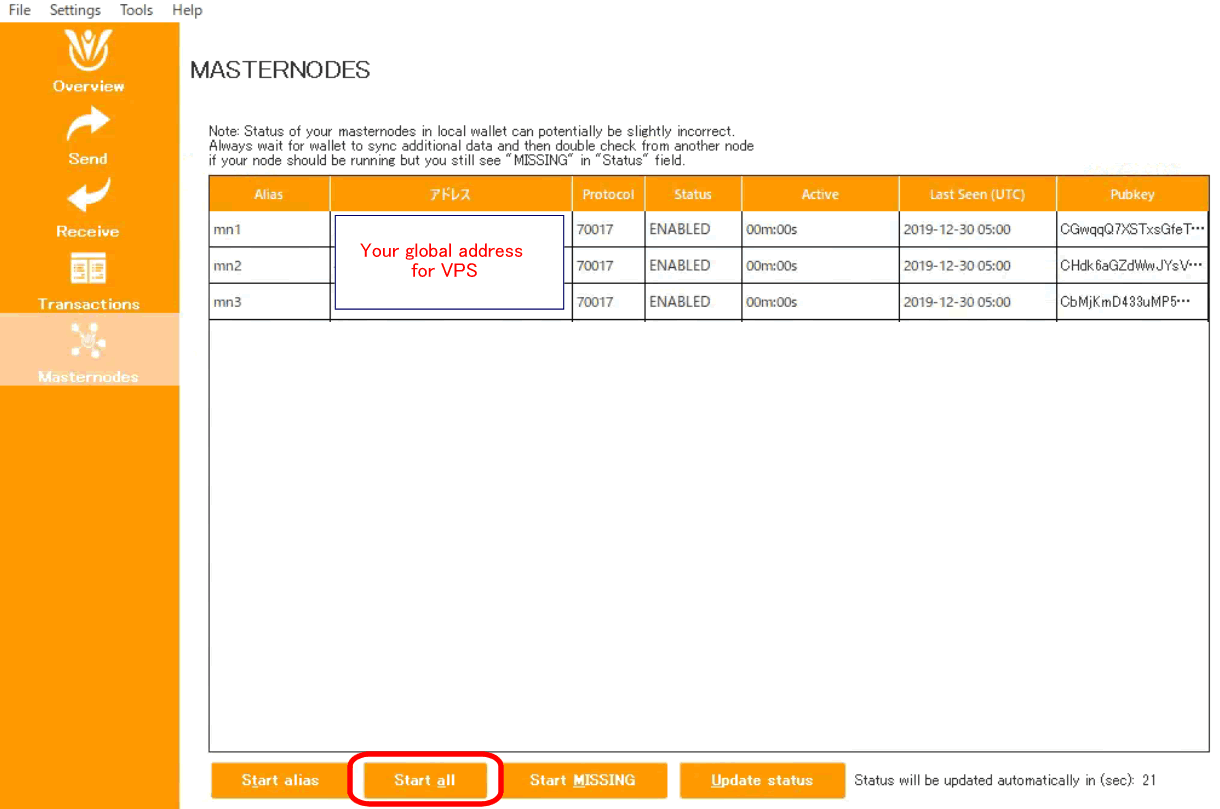
STEP 7 : START MASTERNODE#
Start Windows Client and click the master node tab.
The three addresses that have been set are displayed.
Click the [Start all] button.
That is all.
VPS registration registration and setting#
For details, refer to vps_setup.
We will use vulter for VPS URL : https://www.vultr.com/
Automatic setup of Masternode#
Coming soon ...
Canceling Masternode setting#
Step 1: Stop the master node on the remote wallet#
Step 2: Delete masternode configuration from local wallet#
- Shut down Wallet
- Go to the data directory and delete the line created in step 7 from masternode.conf
- Start wallet again
- 10000 MTNS will be unlocked